Interior
Interior
Single-Face-Wall
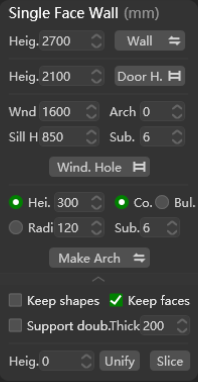
Supports the creation of elements for interior design such as walls/door openings and windows based on set parameters, recommend to use on single-face-wall.
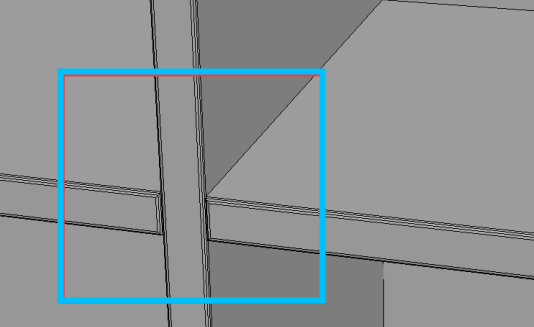
Wall: Click to generate a wall model from the selected spline based on the set height;Doorway.: Click to generate a doorway on selected area based on the set height;+ Window(Add window): Click to generate a window opening on selected area based on the set parameters, including the window height (Heig.), arch height (Arch), window sill height (Sill H.) and subdivision number (Sub.);Make Arch: Click to generate an arch on selected area based on the set parameters, including the Arch height (Heig.), direction (sunken↓/raised↑), radian (Radi.), number of subdivisions (Sub.);Keep shapes: Check to keep the shape (edge) while extruding;Keep faces: Check to keep a surface while create doorway/windows on the wall;Support doub.(Support double): Check to create doorway/windows on the both side of the wall;Thic.(Thickness): where you can set wall thickness;Unify: Click to unify the height of selected walls to the value you set in front;Slice: Click to slice walls according to the value you set;
Double-Face-Wall
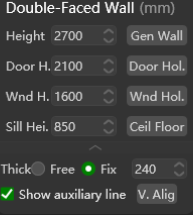
Supports the creation of elements for interior design such as walls/door openings and windows based on set parameters, recommend to use on double-face-walls.
Gen. Wall(Generate wall): Click to quickly generate walls according to the height you set;Gen. Door(Generate doorway): Click to quickly generate doorway according to the height you set;Gen. Win.(Generate window): Click to quickly generate window opening according to the height you set;Ceil Floor: Click to create ceil/floor on the wall;
Floor-Plan-Based Walls
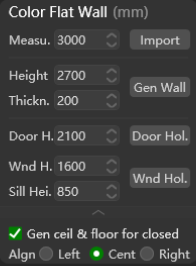
Supports the Import of colored floor plan graphics automatically recognizes the size, and generates walls, doors and windows based on the graphics you import.
Soft & Hard Walls
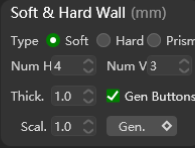
Supports generating surfaces with different textures and material effects for walls according to set parameters.
Type: Click to choose the type of texture and effect you want to apply to the target object;Columns: The number of patterns (bulges) generated per row;Row: The number of patterns (bulges) generated in each column;Thick.(Thickness): Where you can set the thickness of the bulge;Gen. Buttons(Generate buttons): Check to enable buttons between each bulge in soft wall generation;Ratio: Where you can adjust the size of buttons;Gen.(Generate): Click to generate;
Groove
Supports generate different shapes of groove on target objects based on the parameters you set. Supported type of shape including: V, 凵,Funnel,U.
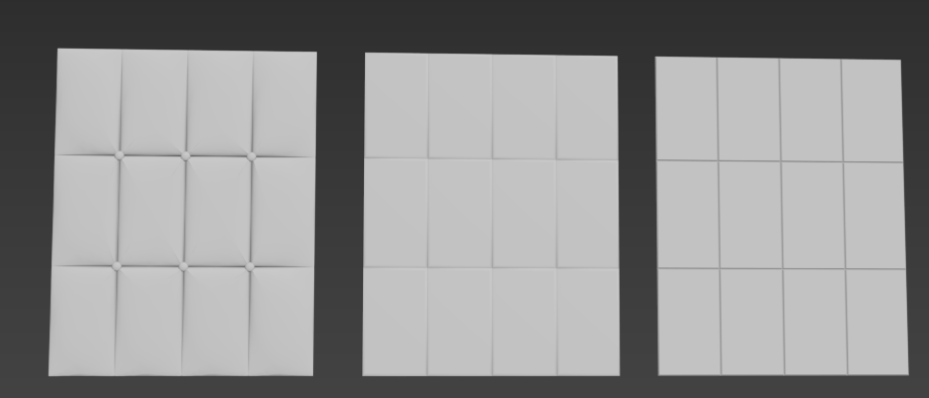
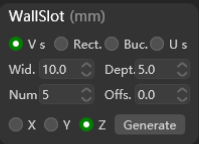
Wall Panel
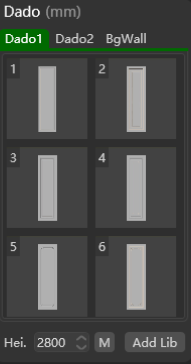
Supports generating specified Wall Panel, Dado skirts, and background walls based on the styles selected in the CG MAGIC library as well as the parameters you set.
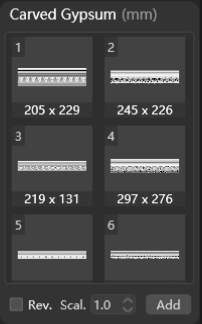
Model - Decorative Line
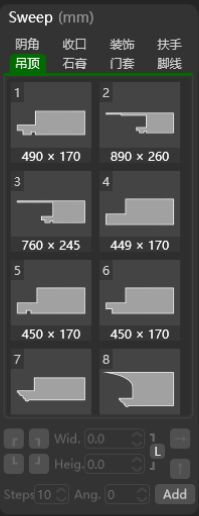
Supports generating various styles of handrails, baseboards, ceilings and other models required for interior decoration based on the size of the target area/plane and the set parameters, including:
Corn.: Inner Corner;Edge: Edge Treatment;Dec: Decoration;Arm.: Armrest;Ceil: Ceiling;Mould.: Plaster moulding;Door: Door frame;Base.: Baseboard/Skirting board;Add: Click to add your own material models to the CG MAGIC library for future use;
Model - Plaster Moulding
Supports creating engraved plaster molding based on selected styles, applying mirror effects (Miro.), resizing (Scal.), or Add your own models to the CG MAGIC library for future use;
Model – Ceiling Tiles
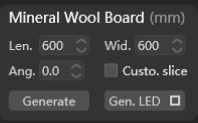
Supports Generate ceiling tiles within the selected plane or based on your spline, according to set sizes (Len. & Wid.) and angles (Ang.).
Custo.slice: Check to generate ceiling tiles within the selected plane, the size of the tiles will be custom sliced to fit the size of the target plane;Gen. LED(Generate LED): Click to generate LED panel on the ceiling tile you select. Note that the LED can only be generated when the target plane is a ceiling tile first;- Gen. LED
口:Click to apply LED panel light within the selected plane, and the light effect is enable by default;?
Model – Floor
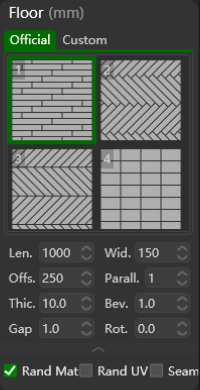
Supports adding texture to the floor according to set parameters. CG MAGIC provides four textures by default. You can also add your own textures to the CG MAGIC library in the Custom tab for further use.
Rand. Mat.: Check to enable random material;Rand. UV: Check to enable random UV;- Seam: Check to enable seam sealing;
Model – Floor Tile Boundary
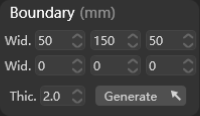
Supports generating floor tile boundary based on parameters in specified splines.
Model – Door & Window
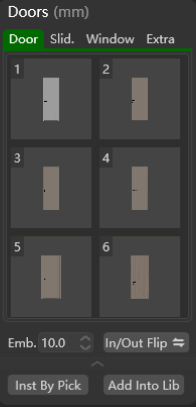
Supports clicking to apply various door and window to the door openings or window openings prepared in advance on the model in CG MAGIC library, or you may add your own textures to the CG MAGIC library for further use.
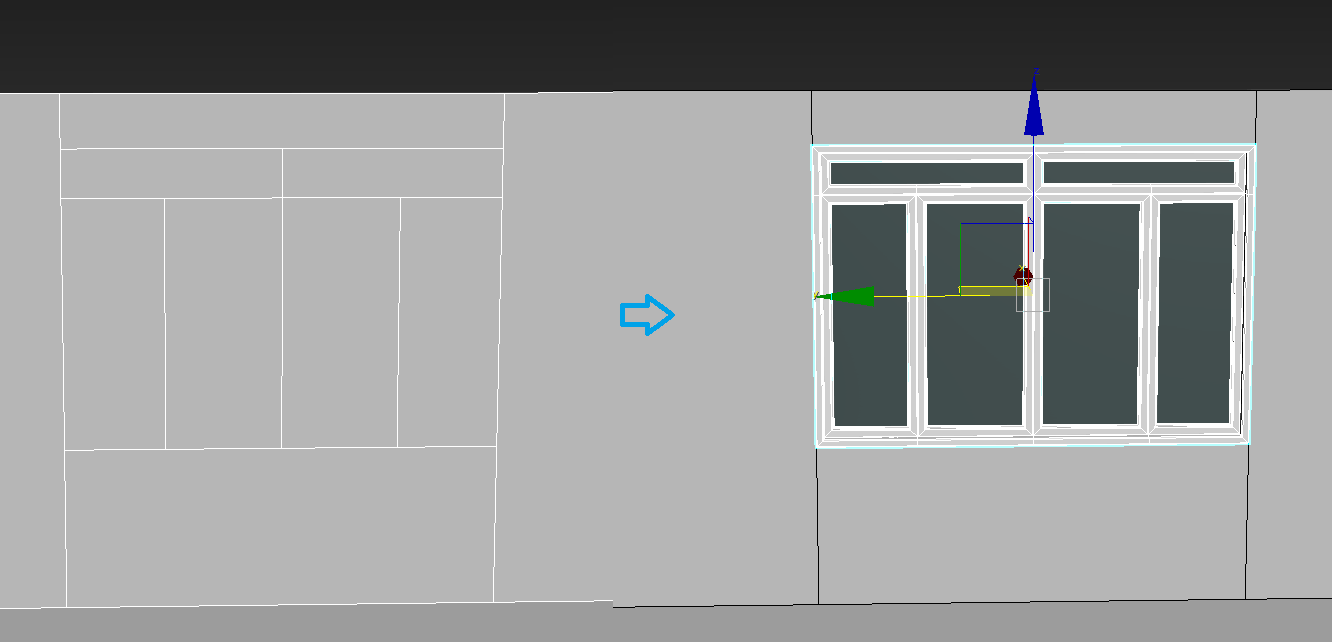
Model – Create Windows
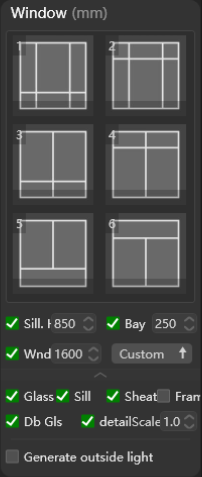
Supports generating multiple types of windows on the target wall according to set parameters.
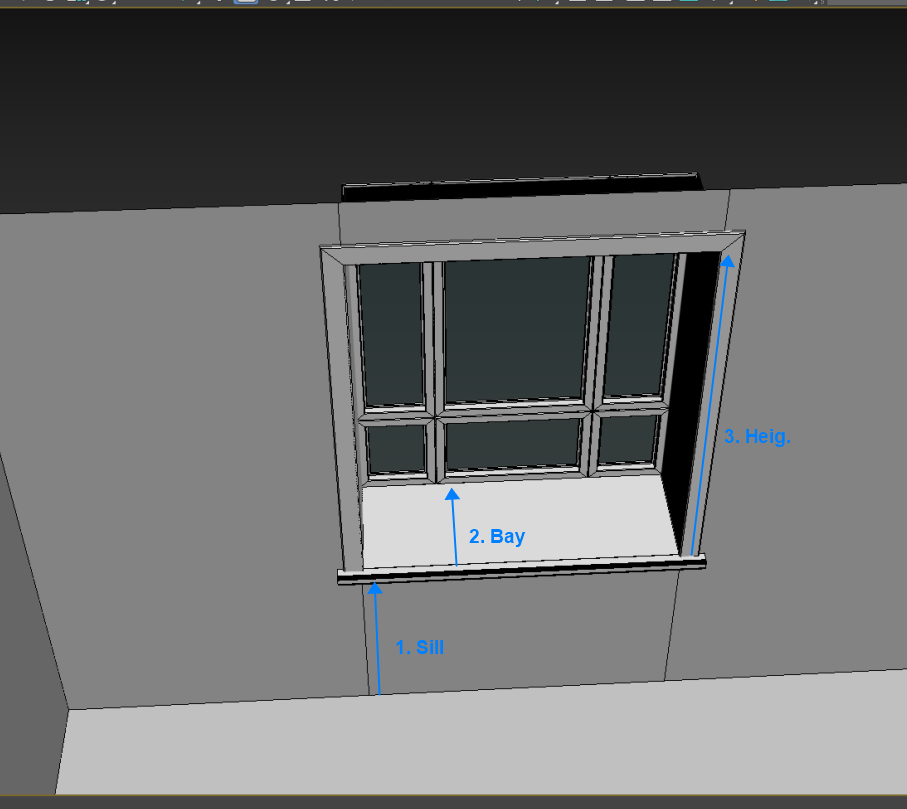
Sill: Check and set the height of the window sill;Bay: Check and set the depth of bay window;Heig.: Check and set the height of the window;
Custom: Click on the drawn window shape to generate the window (sill and casing are not included);- Custom
↑: Click to add the drawn window shape to CG MAGIC for further use; Glass: Check to apply single glass;Sill: Check to enable window sill;Casin.: Check to enable window casing;
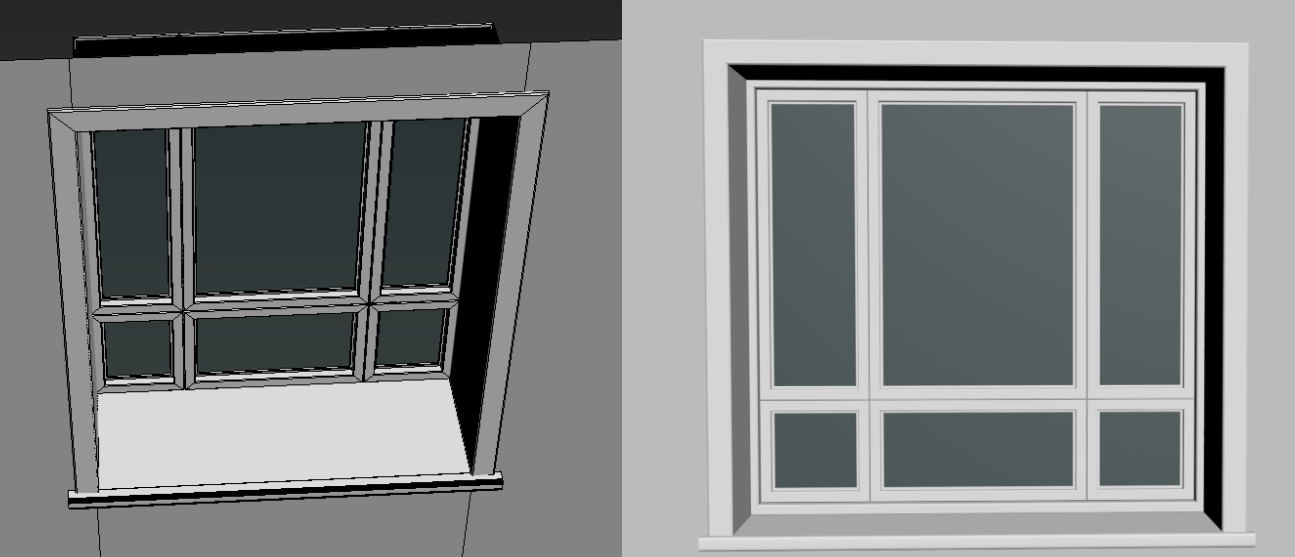
Without (left) frame VS With (right) frame 9. Frame: Check to enable exterior frame of the window; 10. Db Gls: Check to enable double sided glass of the window; 11. Detail: Check to add more details to improve the window effect; 12. Scale: Adjust the size of the window; 13. Generate outside light: Check to generate outdoor lights at the same time as windows;
Model – Stairs
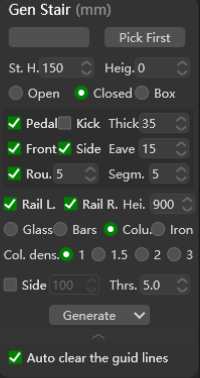
Supports generating multiple types of stairs according to set parameters.
The basic creation steps are:
Select all splines that will serve as steps → Click Set Steps to set as the target object of stair generator → Click Pick First to set the target step as the first step → Choose one step when you want the stair starts → Click Generate.
Note:
All stair-related styles must be checked and set before clicking Set Step.
Editable parameters include:
Rise.: Height of each step;T.Rise.: Total height of the entire stair;
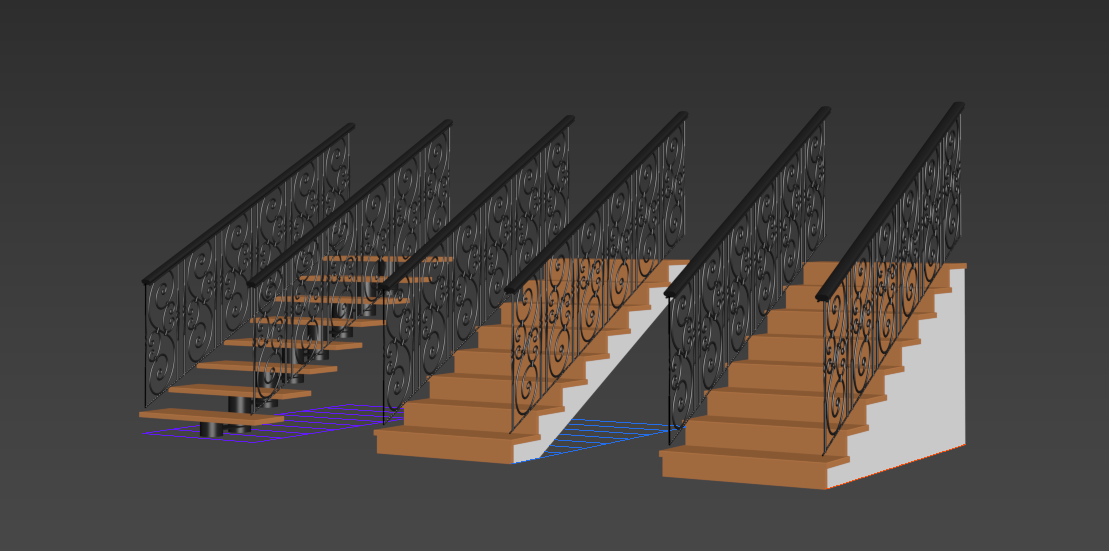
Stair style (from left to right): Float, Open, Closed
3. Stair Style including: Float, Open, Closed
4. Tread: Check to enable treads on each step. Note that the depth and length of treads are generated based on the squares you draw;
5. Riser: Check to enable front guard on each step, only available for Open and Closed stair styles;
Note:
The thickness (Thick) of Tread and Risercan be edit according to your needs, but in a same parameter;
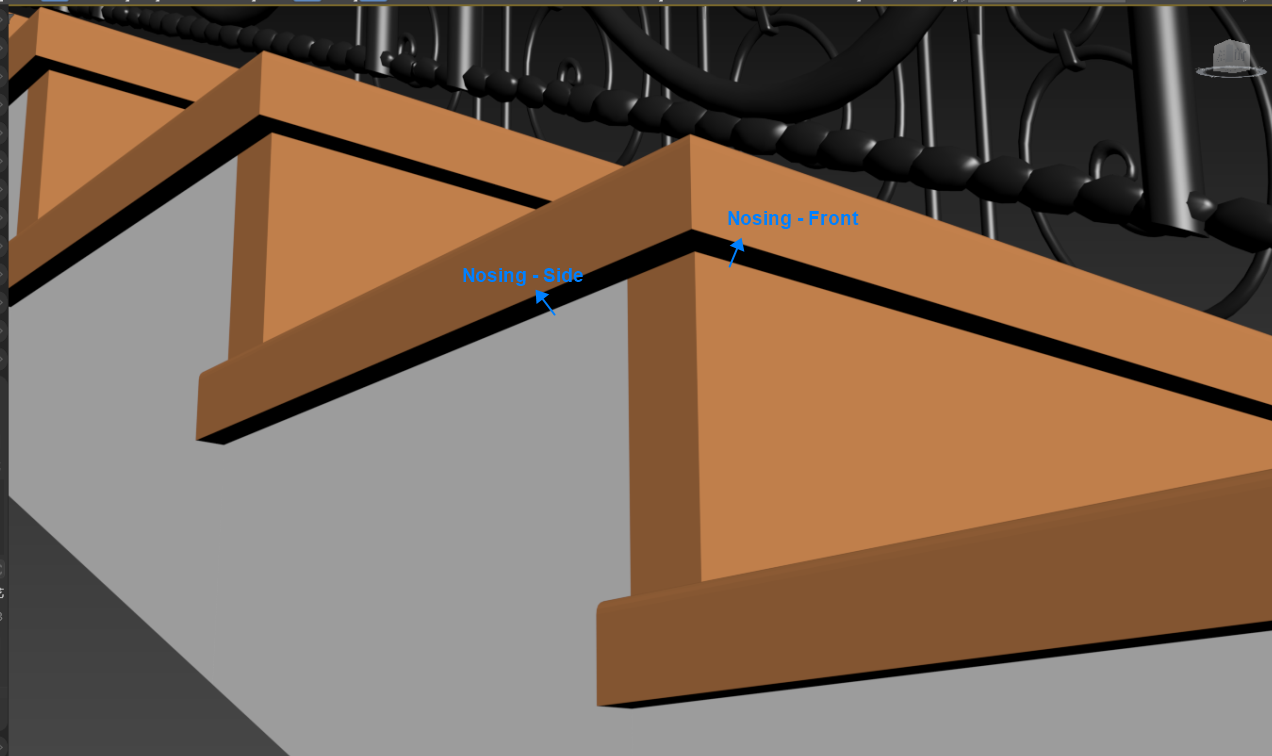
- Support checking
FrontandSideto enable nosing and adjust the thickness (Thick). You may also adjust radius (Radi.) and segmentation (Segm.) to bevel the nosing and improve your stairs; Rail L.: Check to enable the left railing;Rail R.: Check to enable the right railing;Hei.: Adjust the height of railings;

- Railing style including:
Glass,Rod,ColumnandIron; Density: Choose to adjust spindle density quickly;Stri.: Check to enable and adjust the stringer of stair, cannot coexist with the nosing side, and the nosing side will be automatically closed after being enabled;±: Tolerable offset range. When importing a staircase drawing from a CAD file, it is often possible to have gaps directly on the steps. You can enter the tolerable gap distance here, and CG MAGIC will automatically optimize and align the gaps within this distance when generating stairs;
Note:
Trouble shooting on "Please set the step shapes and pick the first one!"
A very common problem for designers who import drawings directly from CAD is that there may be gaps between the imported splines, which may cause the generator to fail to recognize and fail to generate.
For this kind of situation, users can increase the Thrs. (threshold) to avoid generation failure:
- Use the measurement tool of the Display module to measure the maximum gap length;
- Set the threshold to a size greater than the maximum gap length;
- The generator will automatically ignore gaps below the threshold to avoid generating errors;
Model – Railing
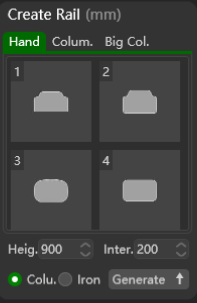
Supports generating various types of handrail and railings according to set parameters. You may select a existed handrail/railing and double-click to replace it with new models in CG MAGIC library, or select a model and click Generate to create a new one.
To create railings with the generator:
- Select types and set parameters
Select the types of handrail (hand), the middle railings (Colum.), and the railings at both ends (Big Col.) from the three types of assets libraries, and set the handrail height (Heig.) and spacing (Inter.) parameters; - Select or create the target shape
Select or create the target shape for generating railings, and the generator will create railings based on this shape; - Click Generate to create.
To replace the existed objects:
- Select the targe object to be replaced;
- Choose the assets you’d like to replace with;
- Right click and click Apply to replace;
To customize your asset library:
- Select your own railing or right click and select Edit to change the assets provided by CG Magic;
- Edit your objects;
- Click ↑ to save the assets to the library;
Model – Escalator
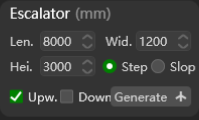
Supports generating escalators according to the set parameters.
You may adjust:
Len.: Length of the escalator;Wid.: Width of escalator;Rise: Total height of the escalator;- Available style of escalator including: Stepped Automatic Escalator (
Step) and Inclined Automatic Escalator (Incline); Up: Check and click Generate to create an animation of the elevator going up, with the animation range applied to the current frame range;Down: Check and click Generate to create an animation of the elevator going down, with the animation range applied to the current frame range;Generate: Click to generate escalator or escalator animation;- Generate
↑: Click and select 3 point to quickly locate the length, width and height and generate an escalator;
Note: You can draw three points directly, or you can use a box or floor layer to assist in positioning.
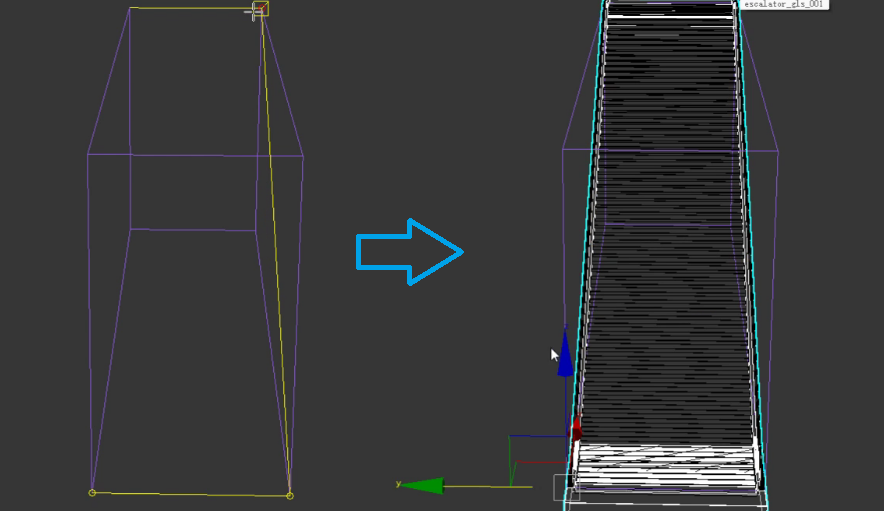
Use a box to assist in positioning
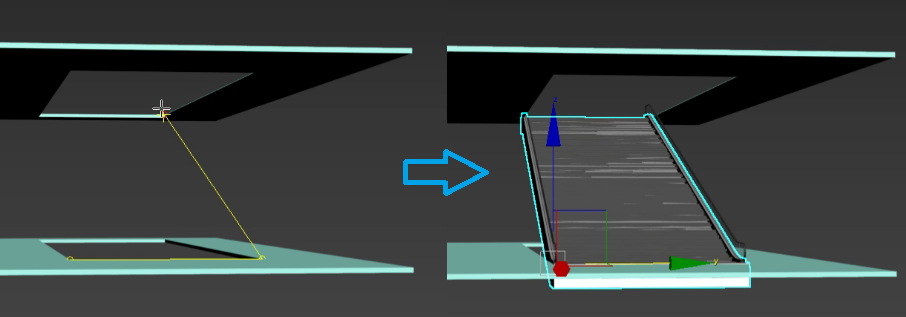
Use a floor layer to assist in positioning
Model – Door Panel/Handle

Supports generating various kinds of door panel and handle according to the set parameters. You may also add customized models to CG MAGIC library by clicking Add To Lib.
Model – Finished Cabinet
Provides multiple types of cupboard models that can be quickly added to the scene.
Model – Custom Cabinet
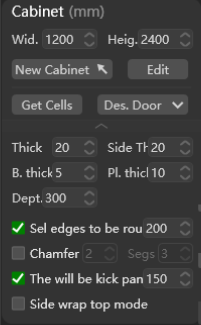
Supports generating multiple types of cabinets according to customized parameters. Editable parameters including:
Wid.: Edit the width of cabinet;Heig.: Edit the height of cabinet;New Cabinet: Click to generate a new cabinet according the set width and height above;- New Cabinet
↑: Click and draw a line to quickly generate a cabinet. The drawn line is used to determine the width of the cabinet, and the height is based on the data of the cabinet you created last time. After creation, you can customize the cabinet design in the editing panel;
Edit: Click to open the editing panel for customizing the interior design of the cabinet;Extract: Extract the interior compartments of the cabinet independently;
- Des. Door: Select a cabinet and click to open the editing panel for customizing the door of the cabinet. CG MAGIC provides 4 kinds of door styles, including: overlay door, inset door, full-flush door and sliding door. You may edit all parameters first and select the door type you want to
Apply.
4 kinds of door styles by CG MAGIC, from left to right: overlay door, inset door, full-flush door and sliding door
- Des. Door
↓:Click to discover more elements that can be used to enrich the cabinet design, including:Retractshelf, add (+) layer, addBuilt-in DrawerorSurface Drawerand create moreClothes Bar;
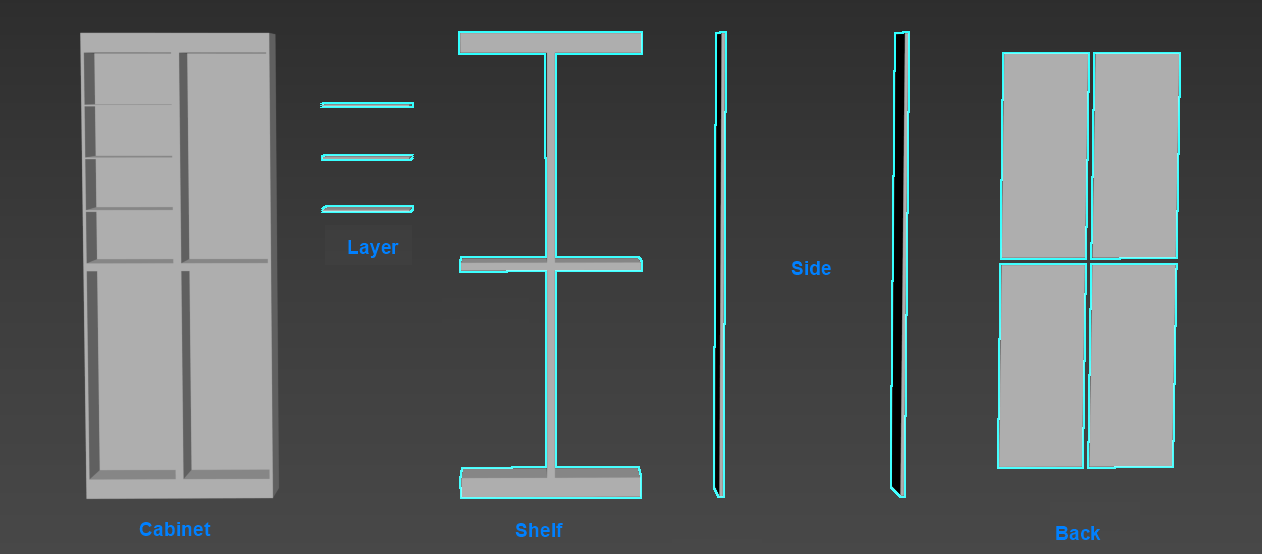
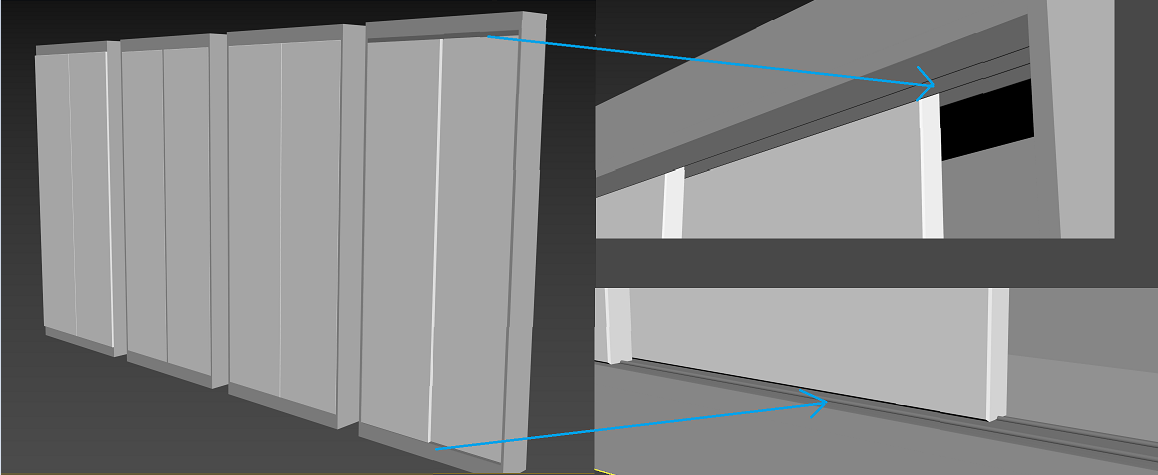
Shelf.: The thickness of the cabinet shelf;Side: The thickness of the cabinet side boards;Back: The thickness of the cabinet back boards;Layer: The thickness of each cabinet layer boards;Depth: The depth of cabinet shelf/side boards/layer;
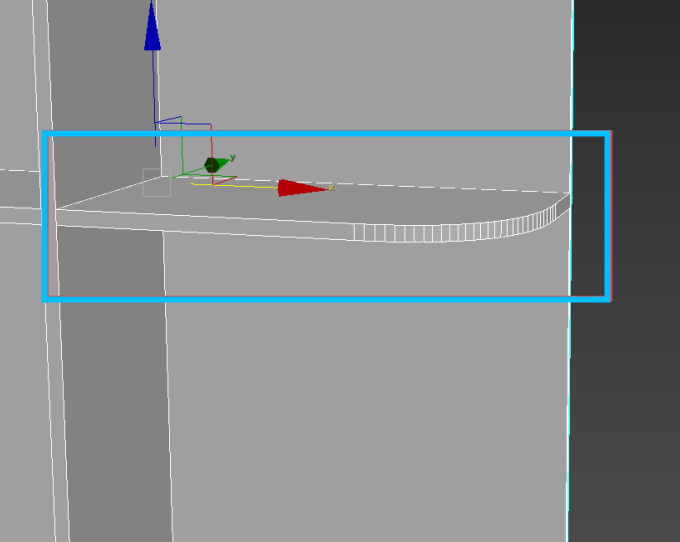
Round edge for open layer 14. Round edge for open layer: Check and elect the side board, open the Cabinet Editing panel, switch to line selection mode, select the line above the layer that needs to be open and rounded, and then click Apply to generate an open cabinet and fillet the selected panel;
Chamfer 15. Chamfer: Chamfer the cabinet according to the set parameters
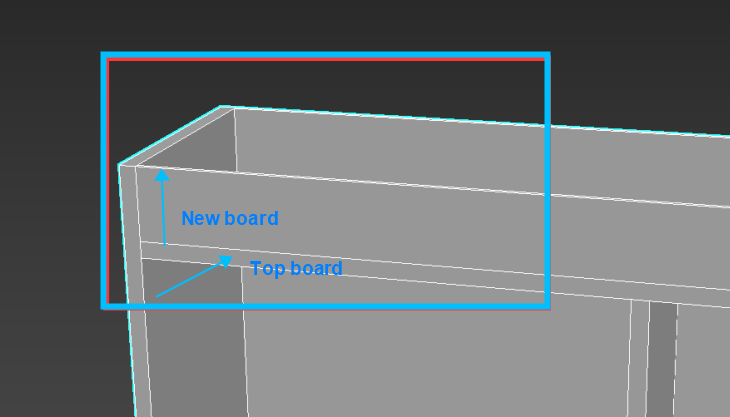
Seal when top/bottom< 16. Seal when top/bottom <: Check and set the value. When the top/bottom board is smaller than the specified value, a new board will be generated to the ground or ceiling so that the entire cabinet is as high as the wall; 17. Side cover top: After checking, when generating the cabinet, the joint between the top and the sides adopts the mode of side covering the top;
Model – Wine Rack
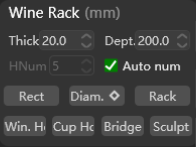
Supports generating multiple types of wine rack according to customized parameters. Editable parameters including:
Thick: The thickness of the wine rack board;Dept.: Depth of wine rack boards;Columns: The number of wine bottles that can be placed in each row;Auto match: Automatically match wine racks according to the number of rows and columns of the selected graphics;
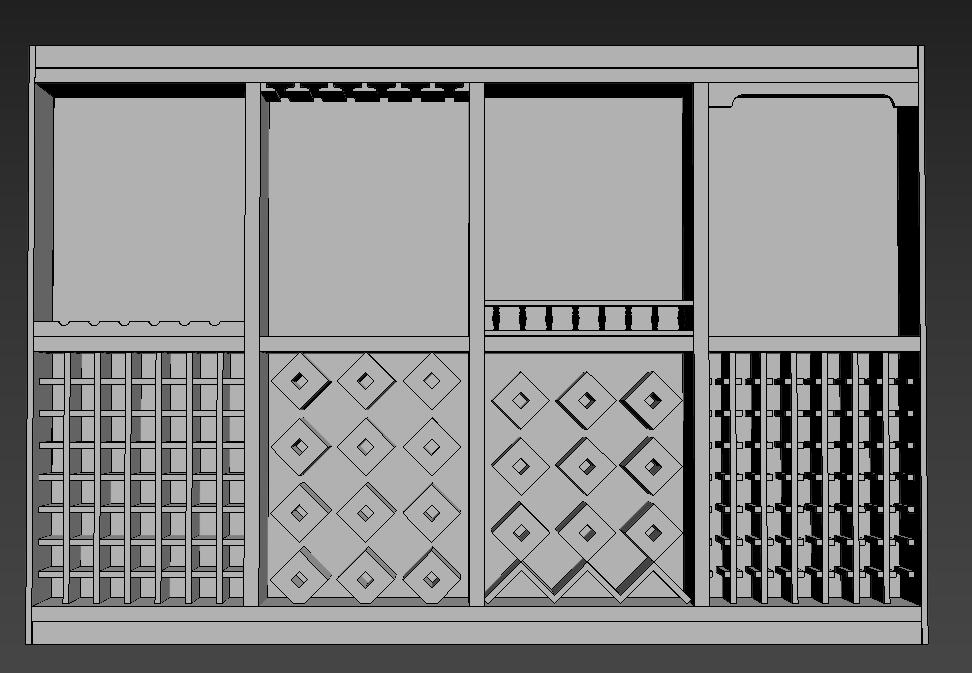
CG MAGIC also provides various kinds of elements for wine rack creation, you may give a look and choose accordingly.
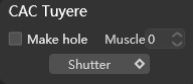
Model – CHVAC
Supports quick generation of various types of central air conditioning outlets according to parameters;
Make hole: Check to make a hole above the CHVAC;Rebar: Set to add more reinforcement elements to the air conditioning duct;
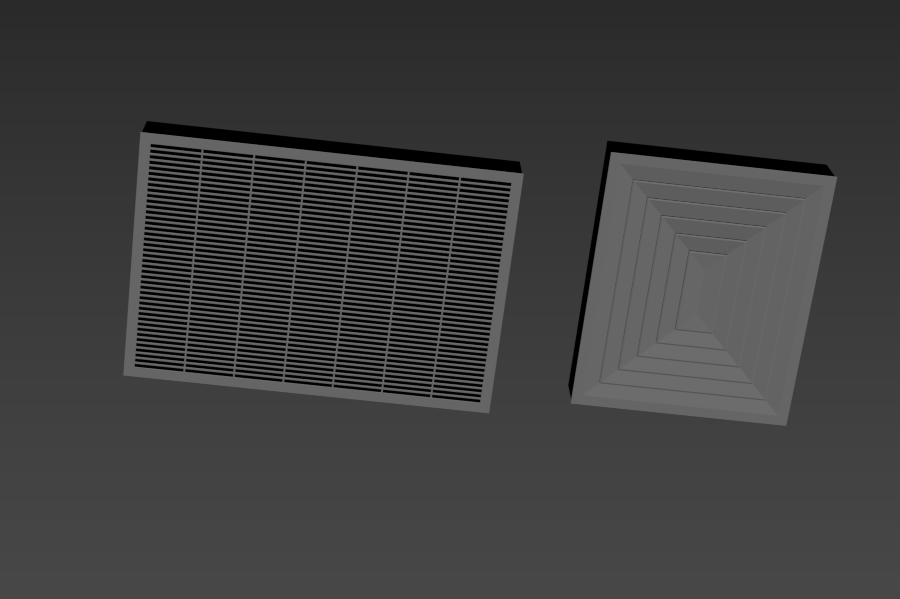
Blade Louver:Click to generate blade louver;- Blade Louver
〇: Click to generate diffuser;
Model – Pipeline
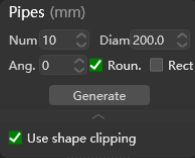
Supports automatic generation of pipeline models based on set parameters;
Num: Number of pipeline to be generate;Diam: Set the diameter of pipeline;Ang.: Adjust the rotation angle of the generated pipe (relative to the current viewport);⚪: Generate circular pipe;口: Generate rectangular pipe;