Render
Render
Test Render
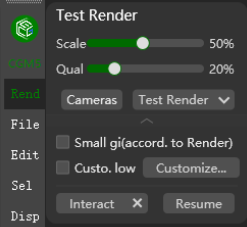
CG Magic supports run render test for both V-Ray and Corona render engine.
Users can adjust the parameters of Scale and Quality by moving the sliders. CG Magic will make overall adjustments to the rendering parameters according to the ratio you set, thereby helping users reduce rendering time and conduct quick rendering tests.
Note:
Scale refers to resolution of the output file;Quality includes all parameters that will influence your render quality;
If you have several cameras need test, click the Multicam button to active the feature, click Test Render and choose the cameras you need to perform test simultaneously, then click Test to render all the cameras.
You may hold Ctrl to choose several cameras, or click + to test all the cameras right away.
Click the down arrow inside the Test Render button to expand the full menu and view more options for channel rendering supported by CG Magic.
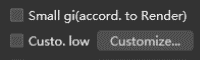
More options to speed up rendering:
Check the
Smaller GI (Ratio-based)option, and CG Magic will reduce the parameter settings according to a fixed ratio;The
Custom Paraoption allows you to save customized parameters for different ratios.There are chances that you may want to change parameters that will affect quality, not just in a fixed percentage. In that case, you may check the
Custom Paraoption. Adjust your rendering settings in the render engine panel first, then clickSetand apply the changed parameters to a percentage (0% - 100%). Then when you move the sliders of Quality to the certain percentage, instead of make overall adjustments to the rendering parameters according to the ratio you set, CG Magic will perform test with the parameters you customized.

For V-Ray and Corona, CG Magic supports real-time rendering.
You may click Interact and adjust the scene arbitrarily to see the real-time interactive effect.
Note:
Real-time rendering has higher requirements on your workstation, so please use it with caution based on your computer configuration.
For Corona, CG Magic supports quick resumption from a file previously saved with the “Save CRX” function by click Resume.
Render Submission
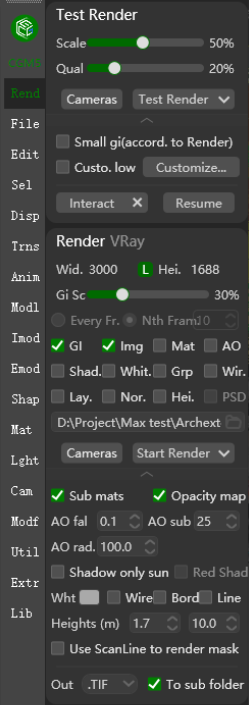
For rendering the final outputs of V-Ray or Corona render engines, customized settings are also supported by CG Magic. According to CG Magic’s default function layout sequence, it supports:
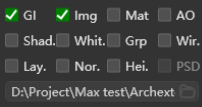
GI: Adjust GI size proportionally;Every Fr.: Render GI of every frame;Nth Fram: Render GI every Nth frame;GI: Render GI;Img: Render final image;Mat: Render material;AO: Render AO Mask;Shad.: Render Shadow Mask;Whit.: Render White Mat;Grp: Render Group Mask;Wir.: Render Wire Color MaskLay.: Render Layer Mask;Nor.: Render Normal Mask;Hei.: Render Height Ref. Mask;PSD: Photoshop Document;
By checking the features according to needs, users may then customize the output path for final rendering.
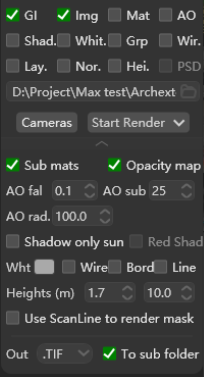
For V-Ray rendering, CG MAGIC enable users to render GI in small resolution first before start the final render, in order to reduce your render time in advance. In addition, You may click Multicam to render several cameras simultaneously, or click the Render button to add cameras from different scenes for batch rendering .
Note:
- The TIF format is adopted by default, and users can also modify the format in the expansion section;
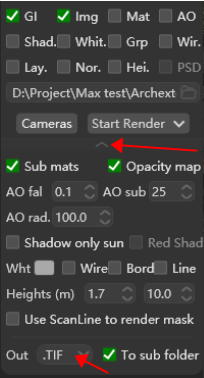
- The file will be output to the Render folder where the 3dsMax file is located by default, and the file name will be automatically processed to prevent overwriting. If you need to customize the file address, you can also modify it in the panel.
Batch Render
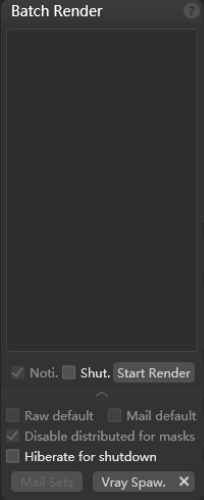
Batch rendering is performed based on the angle, resolution, channel and other information configured in the submitted by users. When the software crashes, CG MAGIC will auto-restart rendering, and any abnormal task will be skipped automatically as well.
Users can adjust the rendering priority by dragging the order of tasks in the Batch Render list, perform Pause render, Re-render, Delete, and Clear all operations on tasks, and can also hover the mouse over a task to view task details.
Note:
When activating a rendering completion task and clicking batch rendering, CG MAGIC will re-render the task.
Render Operation
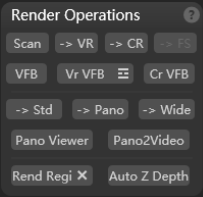
Scan: Switch to scanline renderer. If the current renderer is scanline renderer, the rendering parameters will be reset;-> VR: Switch to V-Ray renderer. If the current renderer is V-Ray, the rendering parameters will be reset;-> CR: Switch to Corona renderer. If the current renderer is Corona, the rendering parameters will be reset;VFB: Open the 3ds Max Frame Buffer window;VR VBF: Open V-Ray Frame Buffer window;VR log: Open V-Ray rendering log;CR VFB: Open Corona Frame Buffer window;-> Std(Standard): The current scene camera is modified to the standard camera state;-> Pano(Panorama): The current scene camera is changed to panoramic camera state;-> Wide(Wide Angle): Modify the current scene camera to a wide-angle camera effect;Pano Viewer(Panorama Viewer): View panorama image from your;Pano2Video(Panorama to video): Convert panorama image to a video;Render region: Configure the render region range of the current viewport;- Render region
X: Close the render region of the current viewport Auto Z depth: Auto-match the depth of field parameters based on the object
Note:
Corona rendering does not support wide angle mode.
Render Preset
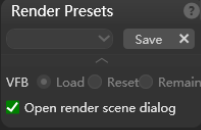
Save: record the parameters of the current scene;
Load: Automatically load the recorded parameters into the current scene;
Open the rendering panel: open the render panel after loading the preset;
Note:
- Due to 3ds Max version compatibility issues, lower version software cannot load higher version presets;
- Due to V-Ray version compatibility issues, when loading V-Ray parameters from a lower version to a higher version, the rendering efficiency may be poor and noise reduction cannot be performed. It is recommended to save the rendering parameters of the higher version after resetting the renderer parameters.
Gamma Setting
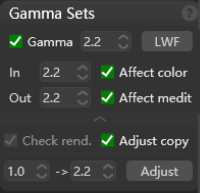
Check Gamma to configure the gamma value in 3ds Max. In addition, the hidden In (input) and Out (output) values in 3ds Max 2013 and above versions can also be configured here.
LWF: Click to configure LWF for physically correct rendering;Check: Perform secondary correction for files with incorrect gamma settings;
Note:
- To prevent incorrect rendering results, please do not change the gamma-related configuration if
LWFis enabled; - The effect of correction may not be ideal for overexposed or dark pictures. It is recommended to check the scene and re-render it.
Mask Setting
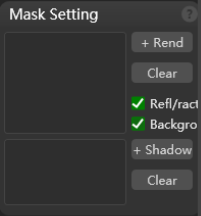
+ Render: Supports supplementary rendering of some objects in the scene.
+ Shadow: Add the specified model in the rendering, and accept the shadow region to add the specified model for rendering.
Note:
After rendering, you need to click Clear to restore the settings.
Override Material
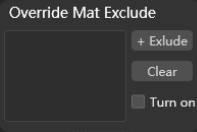
Configure the override material for V-Ray or Corona, and add/delete some excluded models.